
The 1.0 Revolution, New Work System & Condensation Rewrite
Version 1.0 expanded Work Suitability from a ceiling of Level 4 to Level 10, invalidating every pre-1.0 guide. Where players once celebrated a Level 4 Anubis as the pinnacle of crafting, that same Pal now sits at the bottom of a much deeper ladder. The scale introduces natural Level 8 specialists for every work type, and condensation can push them even higher, up to Level 10 for the most dedicated breeders.
The condensation system itself received a major rebalance. Previously, reaching max rank required 116 duplicate Pals; that number has been slashed to 48. This reduction makes fully upgraded workers far more attainable for the average player, though the payoff is massive. Since a natural Level 8 specialist reaches Level 10 at 4★ condensation, you only need 48 duplicates to unlock maximum potential. The work speed values for Kindling and Handiwork jump from 1,900 at Level 8 to 5,400 at Level 10, a nearly threefold increase that rewards those who invest in condensation.
New endgame structures also reshape base planning. The Clinic and Ancient Clinic make Medicine Production a meaningful stat for managing SAN depletion, pushing Pals like Silvance into the spotlight.
Best-in-Class Specialists, The New Level 8 Lineup
Each work type now boasts a natural Level 8 specialist, acquired through breeding combinations or late-game zones. Here is the complete roster with acquisition hints:
- Solenne (Handiwork 8), Bred from Blazamut Ryu + Faleris Aqua. It is the undisputed king of crafting, far surpassing any legacy worker.
- Renjishi (Kindling 8), Bred from Jormuntide Ignis + Lyleen. The best fire Pal for smelting ores and cooking food at blistering speed.
- Shaolong (Watering 8), Bred from Jormuntide + Blazamut. Max-level watering for farms, mills, and water wheels.
- Dandilord (Planting 8), Bred from Lyleen + Petallia. Keeps your berry and tomato patches running at peak efficiency.
- Orserk (Generating Electricity 8), Captured in the late-game volcanic region. Powers any high-drain base with a single Pal.
- Jetragon (Gathering 8), Legendary Pal found in the northern desert. Harvests from trees, berry bushes, and other renewable sources with a 4.5x multiplier at Level 8, reaching 5.5x at Level 10.
- Aegidron (Mining 8), Bred from Warsect + Blazamut. Tears through ore nodes and stone pits faster than any alternative.
- Silvance (Medicine 8), Found in the Sanctum of Wisdom dungeon. Essential for producing high-tier medicines and keeping your base’s SAN high.
- Bastigor (Cooling 8), Bred from Ice Reptyro + Helzephyr. Ideal for refrigeration and temperature-sensitive production.
- Celesdir Noct (Lumbering 8), Bred from Lyleen Noct + Frostallion. Chopping wood at a rate that makes lower-level lumberers obsolete.
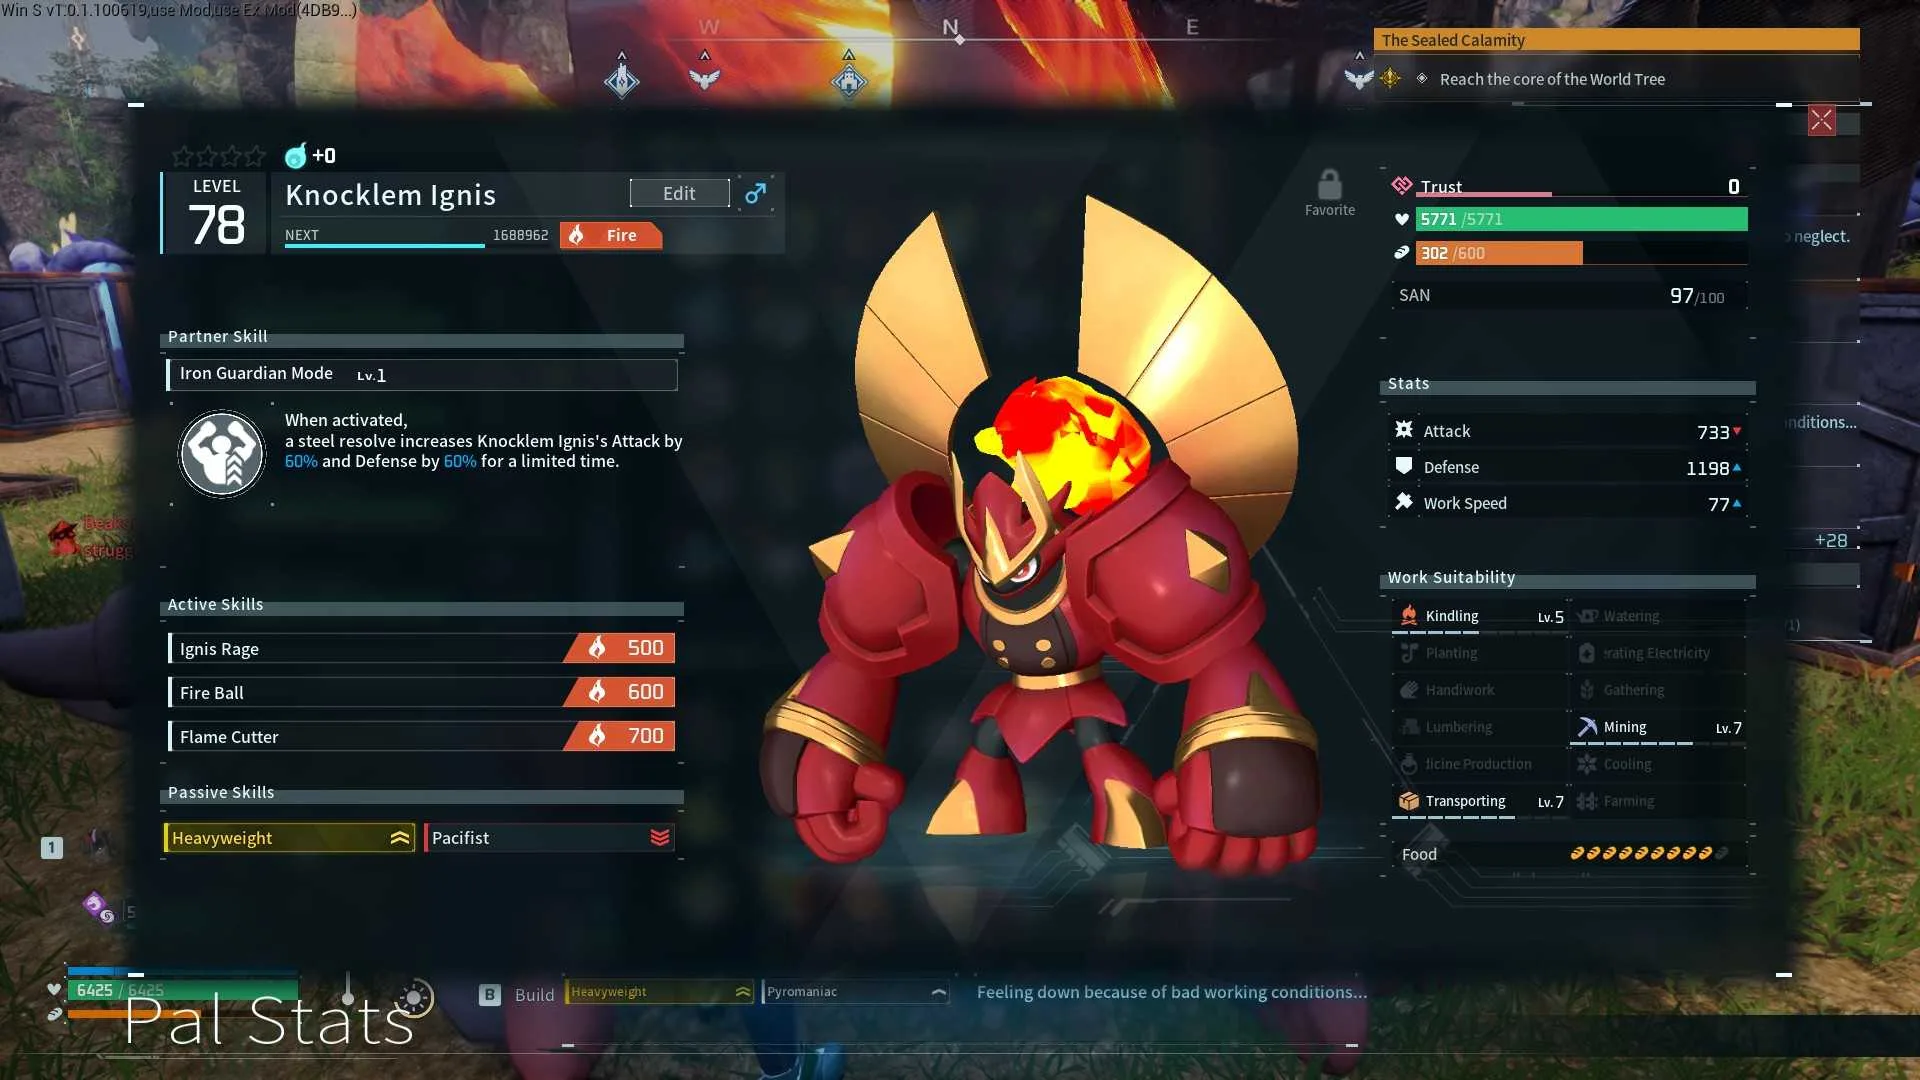
Several multi-role specialists deserve special attention. Knocklem Ignis wields both Kindling 8 and Transporting 8, making it a powerhouse for any production line needing heat and logistics. It is found at the World Tree after defeating Panthalus. Tetroise Primo pairs Mining 8 with Transporting 8, letting a single Pal handle both extraction and delivery.
Game-Changing Support Pals & Aura Builders
Raw stats are only half the equation. Version 1.0 introduced support Pals whose passive auras boost every other worker in your base, enabling multiplicative gains.
Puffolt’s passive grants +1 Generating Electricity to all base Pals. One Puffolt in your lineup can elevate a Level 7 Electrician to Level 8 work output, or push a Level 8 specialist to Level 9 territory. For any base that relies on power, and most late-game bases do, Puffolt is an irreplaceable linchpin.
Sekhmet’s Desert Empress ability boosts Anubis’s work speed by 20, 50% and workbench speed by 30, 60%. Even though Anubis has been superseded as a top-tier Handiwork Pal, Sekhmet makes it still viable as a workbench booster. Placing Sekhmet with a pair of Anubis workers creates a powerful synergy that can rival low-level specialists during the mid-game.
The strategic stacking of these auras multiplies your base’s efficiency. Combine Puffolt with Orserk for free Generating Electricity levels, and pair Sekhmet with Anubis to squeeze every drop of productivity from your legacy workers before you fully transition to the new specialists.

Early-to-Late Progression, Choosing the Right Pals at Each Stage
You do not need Level 8 specialists on day one. The early game still relies on proven workhorses.
Early game: Anubis (Handiwork 4 + Mining 3) remains the best all-round early worker. Incineram covers Kindling, Mining, and Transporting in one slot. Wispaw barely sleeps and covers four low-level roles: Handiwork 2, Lumbering 1, Medicine 1, and Transporting 1. These Pals will carry you through the first dozen hours until you can access breeding.
Mid-game transition: Once you unlock breeding, start working toward the Level 8 specialists. The breeding recipe for Solenne (Blazamut Ryu + Faleris Aqua) should be a top priority. Similarly, aim for Renjishi and Shaolong to replace your Jormuntide Ignis and Jormuntide. The condensation rework makes it feasible to max out one or two specialists during this phase.
Late-game optimization: Replace every old worker with a Level 8 specialist. Condense them to 4 stars for Level 10 output. Integrate Puffolt and Sekhmet into your lineup for aura boosts. Slap down a Clinic and assign Silvance to keep your team’s SAN topped off. At this stage, your base should run almost autonomously.
Special Mentions, Beegarde, Dualith & Multi-Role Efficiency
Even in the 1.0 era, some niche Pals remain irreplaceable. Beegarde is the only reliable source of Honey, a critical ingredient for Cake and thus for breeding. Every base needs at least one Beegarde, preferably with high work suitability to also contribute to gathering or farming.
Dualith covers five work types: Planting 3, Gathering 3, Lumbering 5, Mining 6, and Transporting 6. While its levels are lower than the top specialists, it can replace multiple single-role workers early on. Tucking a single Dualith into your base frees up slots for other specialists, making it an excellent space-saving option.
Efficiency is about more than raw numbers. By stacking multi-role Pals alongside specialists and support auras, you can build a compact base that does more with fewer Pal slots. Resist the temptation to fill every slot with a pure stat stick, sometimes a generalist like Dualith or a support like Puffolt delivers more net value.
Building the Ultimate Factory, Your 1.0 Blueprint
Palworld 1.0’s base meta is deeper than ever, but with the right knowledge you can skip the grind and build a powerhouse factory. Focus on the new Level 8 specialists for raw output, leverage support auras for free stat boosts, and never forget the humble Beegarde. Whether you’re a returning player or starting fresh, this guide gives you the blueprint to dominate base management in the 1.0 era. Now get out there, breed those perfect Pals, and watch your base run like a well-oiled machine, and if you need a deeper dive into specific breeding chains, check back for our upcoming companion guide.





Comments
Join the Conversation
Share your thoughts, ask questions, and connect with other community members.
No comments yet
Be the first to share your thoughts!