Finding the Clue, The Torn Page and the Chimera
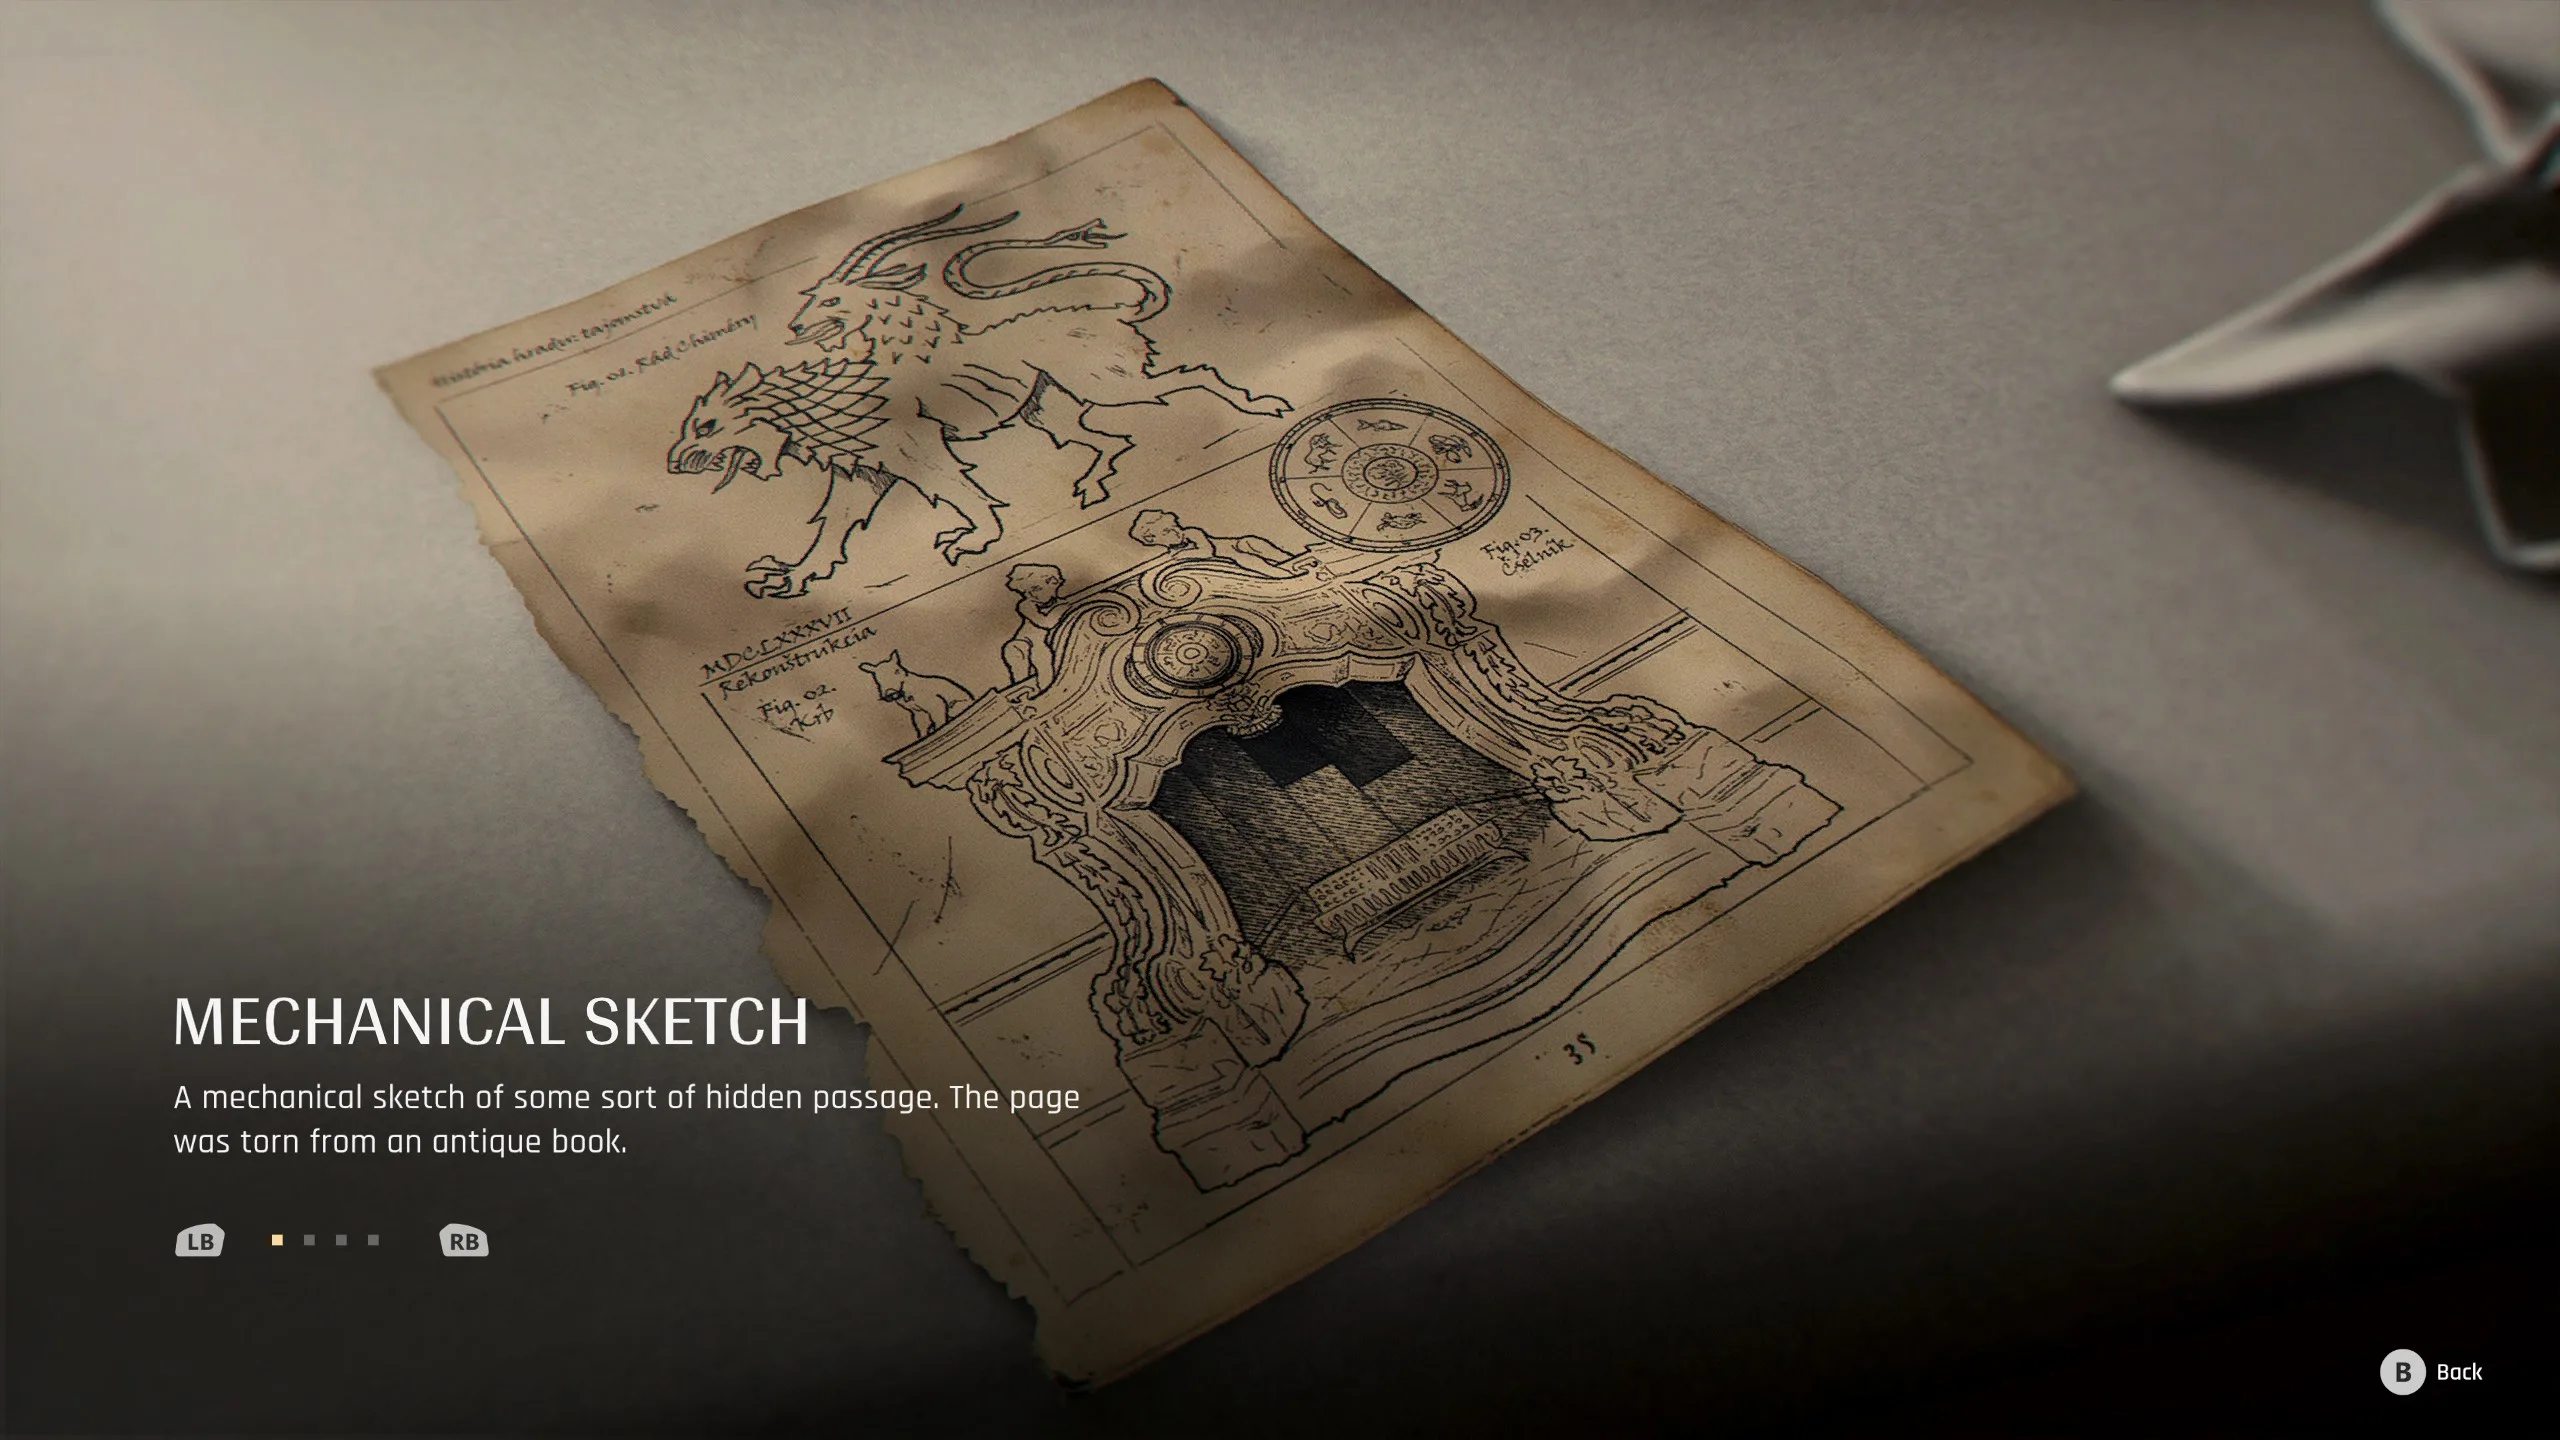
Before you touch the dial, locate the primary clue. In the center of the dining room, on a serving cart (or laundry cart, depending on your camera angle), lies a torn book page. It depicts a chimera, a mythological beast with the head of a lion, the body of a goat, and a serpent’s tail. This illustration is the key to the puzzle.
You can pick up the page and add it to your inventory. If you need to revisit the clue at any time, open the mission menu, navigate to “Items,” and select the mechanical sketch. The image will be displayed again, saving you a trip back to the cart.
An optional, earlier hint exists: the book from which the page was torn can be found backstage, behind a tournament screen near the laundry room. While not required, that book reinforces the chimera theme and provides a bit of world-building for the hotel’s emblem.
Interpreting the Chimera, What the Symbols Mean
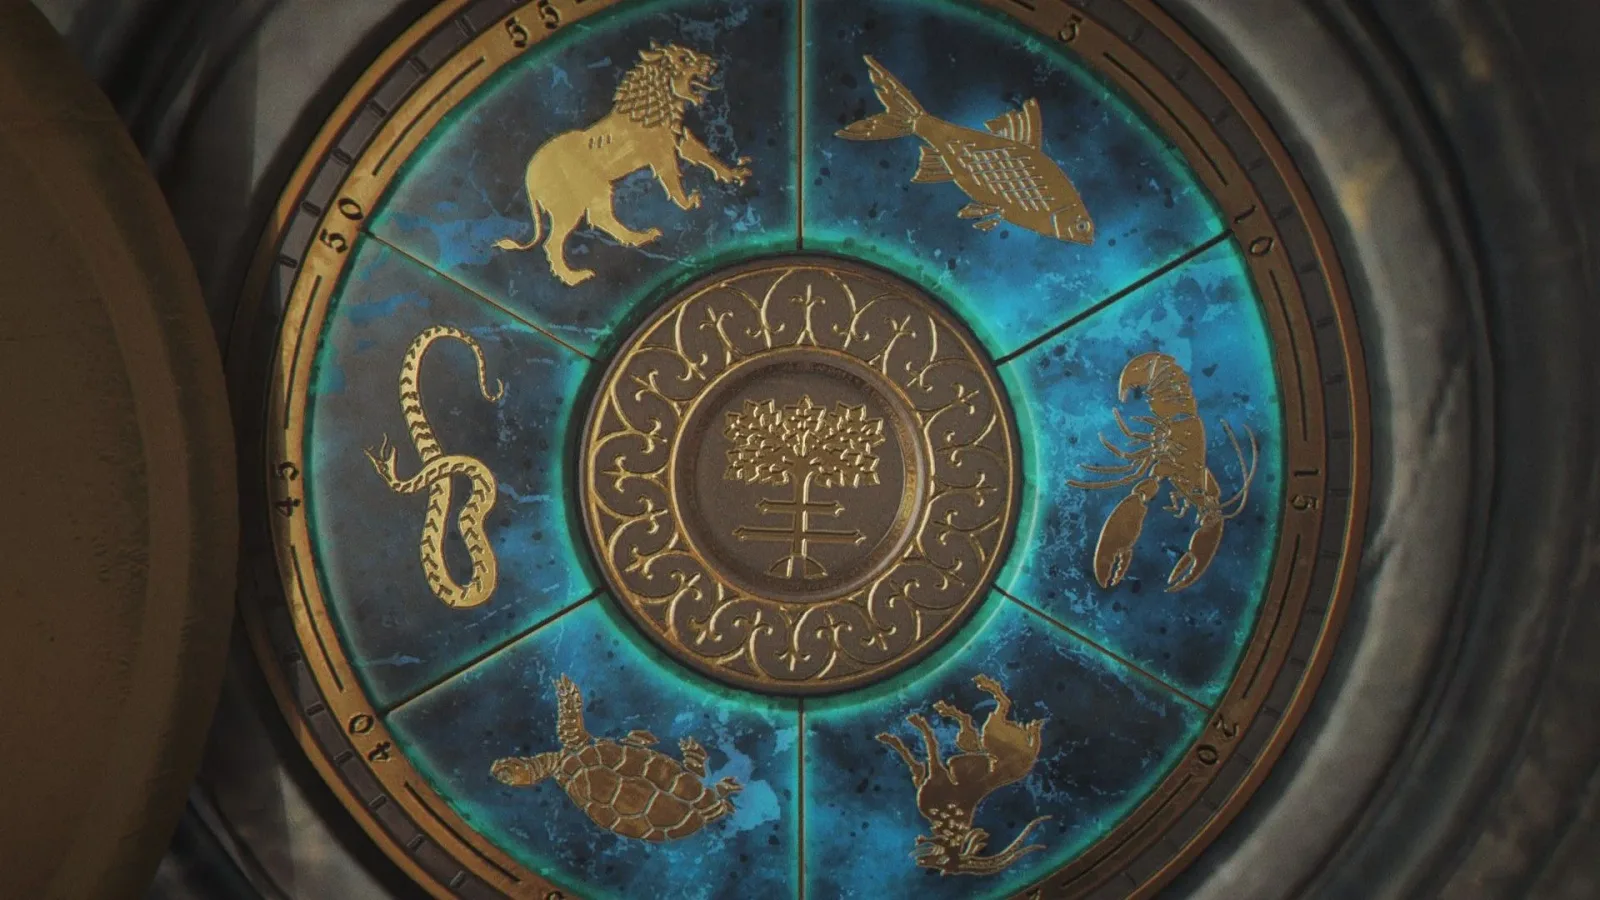
The chimera is a composite of three distinct animals: a lion (head), a goat (forward body), and a snake (tail). The fireplace dial has six circular icons, each representing a different creature. Only three are relevant to the chimera: Lion, Goat, and Snake. The other three, which are decoys (such as a dog, a hawk, and a fish), do not match the chimera.
Some early online guides mistakenly used the term “ram” for the goat symbol. The chimera of Greek mythology is universally depicted with a goat’s head, and the in-game icon clearly shows a goat’s horned profile, not a ram’s curled horn. So trust your eyes: if the symbol looks like a goat, it is correct.
Solving the Mechanism, The Correct Symbols (Order Doesn’t Matter)
Here is the part that has caused the most confusion. The dial is a circular panel with six raised animal icons. You press (or tap) each symbol to select it. The solution is simple: press the Lion, Goat, and Snake icons. (Remember: pressing any incorrect symbol will forfeit the Chimera challenge achievement, see the next section for details.)
And here is the critical truth: order does not matter. You can press Lion first, then Goat, then Snake. Or Snake, then Lion, then Goat. Any sequence works. Multiple high-authority guides, including Polygon and Screen Rant, explicitly state that no specific order is required. The only requirement is that you press the three correct symbols.
Why did some guides list an order? Because they presented the solution in a clear sequence (Lion → Goat → Snake) as a suggested order for memorization, but none of them proved that a wrong order fails the puzzle. In practice, you can press them in any arrangement and the fireplace will open.
Warning: Pressing any incorrect symbol (e.g., Dog or Hawk) will prevent a perfect solve. You might still complete the puzzle after pressing a wrong symbol, but you will lose the Chimera challenge achievement. So take your time, study the mechanical sketch, and press only the three animals of the chimera.

Earning the “Chimera Challenge” Achievement
The Chimera challenge is an achievement that unlocks if you solve the fireplace puzzle on your first attempt without pressing any incorrect symbols. This means no accidental bumps on the wrong icon, no trial-and-error learning. You get one perfect solve.
Tips for a flawless run:
- Before touching the dial, open the mission menu and review the mechanical sketch. Familiarize yourself with the Lion, Goat, and Snake icons.
- Approach the dial and slowly scan the six symbols. Identify each of the three correct animals by location or visual shape.
- Press them confidently in any order. Do not second-guess yourself.
- Do not press any other symbols, even if you think you might need to “reset” or “confirm.”
This achievement is tied to Chapter 8 (“All the Time in the World”) and cannot be earned on a replay of the same save file. If you miss it, you’ll need to start a new game or a separate chapter replay. So take the extra minute to be precise.
After the Puzzle, The Secret Passage and Collectible
Once the three correct symbols are pressed, the fireplace stonework grinds open, revealing a dark stairway. Step through and follow the corridor. Shortly inside, on a crate or shelf, you will find a playing card collectible, part of the game’s full card set that unlocks bonus content and lore bits.
Pick it up, then continue through the passage. The bellhop’s trail heats up again, and the rest of Chapter 8 unfolds at a brisk pace. The solution you just executed is one of the game’s more rewarding puzzles because it requires observation, not trial-and-error.
The dining room fireplace puzzle is a standout moment in 007 First Light’s Chapter 8, elegant in its mythological reference and fair in its clue placement. The torn chimera page gives you everything you need, and once you know that order doesn’t matter, you can confidently press Lion, Goat, and Snake in any order to unlock the hidden passage. For those chasing the Chimera challenge, a quick review of the mechanical sketch and a steady hand are all it takes to achieve perfection. The bellhop won’t wait forever, but a moment of patience here ensures a clean break and a satisfying continuation of Bond’s latest adventure.



Comments
Join the Conversation
Share your thoughts, ask questions, and connect with other community members.
No comments yet
Be the first to share your thoughts!